After several weekends of getting rained off, I bit the bullet and bought a pop-up car tent. Mary and I did a trial run yesterday and found that the side panels were like a big sail or kite and real difficult to put up. I chose not to use the side panels this time, but if I had all the tie-downs stretched out, it may be possible. Anyway guess what... It didn't rain, not a spot until after I had finished and had dinner. It did keep the sun off though.
----
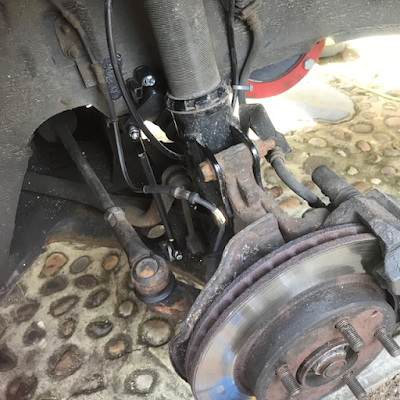
Today's job was to finish fitting the air ride front height sensors. I did the rears at my friend and neighbour Luke's workshop on a 2 post lift and as I needed to run cables under the length of the car. Today's wiring was much simpler and all the work was under the wheel arches, so I could do this with a jack and some axle stands.
----
I drilled 2 holes and mounted an L bracket to the lower wishbone. I fixed the height sensor link rod to the L bracket and with the strut at full extension I marked the position of the other end of the link rod. I then evacuated the air from the strut and jacked it up until the car started lifting and marked the other end of the link rod again on the wheel arch. I measured between the marks and the difference was 50mm (this is not the full height as the bracket was mounted about half way between the wishbone hinge point and the end where the strut connects). I then marked half way between them as this is where the link rod needs to be so I could mount the sensor in the midway position with the arm half way. I connected the sensor to the link rod and set it with the arm half way and set the jack so the link rod end was also at the halfway point. I marked the top and bottom of the sensor and where the holes were, then took sensor spacer mounting plate and used this to mark the holes. I drilled the holes with a small drill as a pilot for the self tapping screws that are used to mount the sensor. I ran the screws in on their own first to cut a thread, then mounted the sensor on the mounting plate to the wheel arch. Did the same on the other side, connected the wires, then set about calibrating everything. The valve block processor has a built in calibration routine that you can set automatically or manually. I tried the auto calibrate first and it took ages pumping the suspension up and down and waiting for the compressor to refill the tank etc. At the end of the calibration I got min height errors on the rear sensors. Next I tried automatic pressure calibration and manual height calibration. After another round of ups and downs, I got to set the min and max heights and then some more up and down to finish the calibration. It's quite fiddly trying to set the limits to a particular pressure as each push of the buttons makes the strut you are adjust jump 2 or 3 PSI each time. This also resulted in minimum height errors on the rear again. So for the last attempt, I did manual pressure calibration and height calibration. It took me about 20 minutes to complete, but it is tip top now. First trip was to the end of my road and back. I used the mid point setting and ran over some bumps and small kerbs, and superb, no donking. I am a happy bunny today. I had a fiddle with some of the presets to put them at the percentage heights I chose instead of the calibrated 25, 50, 75% settings. Now I have what I expected from the air ride and now I can start tidying everything else up so I can start showing it with pride. Zoom in on the photo below to see the detail of the sensor, link rod and bracket etc.