257: Friday 20th September 2013


On Sunday I fitted the standoffs to my rear suspension.
----
To me the suspension is now about 25mm too high.
----
In the photo below you can see the centre of the wheel opening for the body is about an inch above the wheel centre. However I had a little drive and did not catch any speed bumps, even at some speed. I shall endeavour to get air suspension at some point. I may change these standoffs again for 50mm instead of 75mm. This is only a temporary solution until I can afford air suspension. I found a system that bolts straight on for a Probe specifically, but I shall keep looking for other options. With air suspension I can program the ride height and also drop it right down when parked, cool...

256: Thursday 12th September 2013

Sunday I made 4 cables and some copper strips to link up the new batteries. I made the cables using 50mm squared wire and lugs with 8mm holes crimped on. The copper strips were made by flattening some 15mm plumbing pipe in my bench vice. I ran out of time as we had my daughters football match to go to. She is now playing semi-professional in a women's team and our matches are all in stadiums now (nice and dry). I took my car for a brief drive and the extra weight meant I caught every speed bump. The side popped off the rear bumper and needs repair. So I needed to raise the back end. I had some 3 inch standoffs made so I can raise the top of the rear suspension struts and hence the rear of the car by 3 inches. That should be enough. Anyway the parcel came today and they shall be fitted at the weekend. 

255: Saturday 7th September 2013

So I finally took delivery of some fresh batteries. They are from a UPS back-up supply and they are in real good condition. The only thing is that they are only 38Ah. So to try to complement the 92Ah batteries already installed I am running 3 in parallel as equivalent to 1 battery. But as there are 2 batteries to be replaced, I am going to configure them as 2 in series making 24v and do this on three parallel branches. This makes the connections much easier and gets a better balance across these 6 batteries and then the whole pack will work better. I am now desperately trying to figure out how to fund Lithium batteries as this is probably the last stock of recycled batteries I can get as my sources have all dried up. So I have made the racking from wood and it just need the bar across the top to hold them down and that is done. Before that I need to make up the connections. Before that I need to identify the 2 duff batteries again. I know one of them, but not too sure about the second one. Since the car has been on charge for months the batteries have recovered slightly, but I know the range will be crap. The problem is that I cannot take it for the MOT test so that I can use it on the road, but I cannot find the battery that is giving me the crap range until I take it out on the road for a bit. I am going to try my load tester, but at the moment I am not confident. With the extra weight in the back the car sits lower now and when I did take it around the block, I caught every speed bump and popped the rear spoiler off the support bracketry, so that needs repairing. I am now looking for some extender bolts so I can raise the rear suspension a few inches. The rear bumper is only a few inches from the ground now and this is just too low. I need to find $1600 plus shipping and tax etc. to buy an air lift kit then I can raise and lower the car on the move. That's another one for the upgrade wish list!


254: Sunday 14th July 2013


It's been a while since I last added a blog. 2 weeks ago I painted the roof and sunroof panel red and this was the last of the painting to complete the temporary paint job. I had one repair where the front bumper was fitted it was stressing the area where I had joined the 2 panels together and a crack had appeared. So today I cut the crack back and started work on rebuilding it.
----
By applying fibre glass while it is held in position, there will be no stress in the join. I pushed and poked the fibreglass right into the gap so it was filled all the way down and waited for it to set. It didn't take long because it was very hot today.
----
I ground back and sanded the fibreglass then applied layers of body filler. I then waited for it to set again then sanded this back smooth.
----
As before I applied a coat of white primer and when that was dry I gave it a quick rub over then applied the red.
----
Once the red was dry I gave the other panels a quick wipe. Once this has had a chance to set it will be time for good wash, wax and polish. Next job is to remove the front bumper again, mount some driving lights and fit wire mesh on the back like on the rear bumper. I shall be fitting the battery monitoring system soon hopefully.

253: Sunday 9th June 2013

I still have the roof to paint, but I also had a flue pipe to fit on our house this weekend. That took some time and today the weather is not so good, so I decided not to attempt any painting. I did fit the new front license plate. I like the way it looks, fits nicely to the bumper and doesn't hide any of the styling features. Friday my brother came round to check out the body kit fit and finish so we can work out the preparation for the final paint job. I should be able to get a big workshop for a weekend so we can get it nice and heat soaked, smoothed over and primed then flatted and painted. I can start organising the battery monitoring system now and get it fitted and working. It is good timing as I Have at least one, and I suspect more, batteries that are faulty including the auxiliary battery for the 12v system. Then I can put the interior back together and sort out some fresh batteries. Then get a new MOT test and I'll be back on the road. I need to get running again so I can get my car to the workshop for painting. Anyway I am pleased with the new GB number plate.

252: Sunday 3rd June 2013

Yesterday I went to Liverpool with my friend and neighbour so he could get a 4x4 Ford Cougar he was buying. 242 miles and 4 hours later we arrived, paid the guy and then drove back. Before I went I put a coat of red on the front bumper ready to go on. I added a piece of red tube that I had from some old air horns to fill the hood gap at the front. It doesn't close up the gap, but it does stop the line of sight through to inside, so you cannot see all screws etc.
----
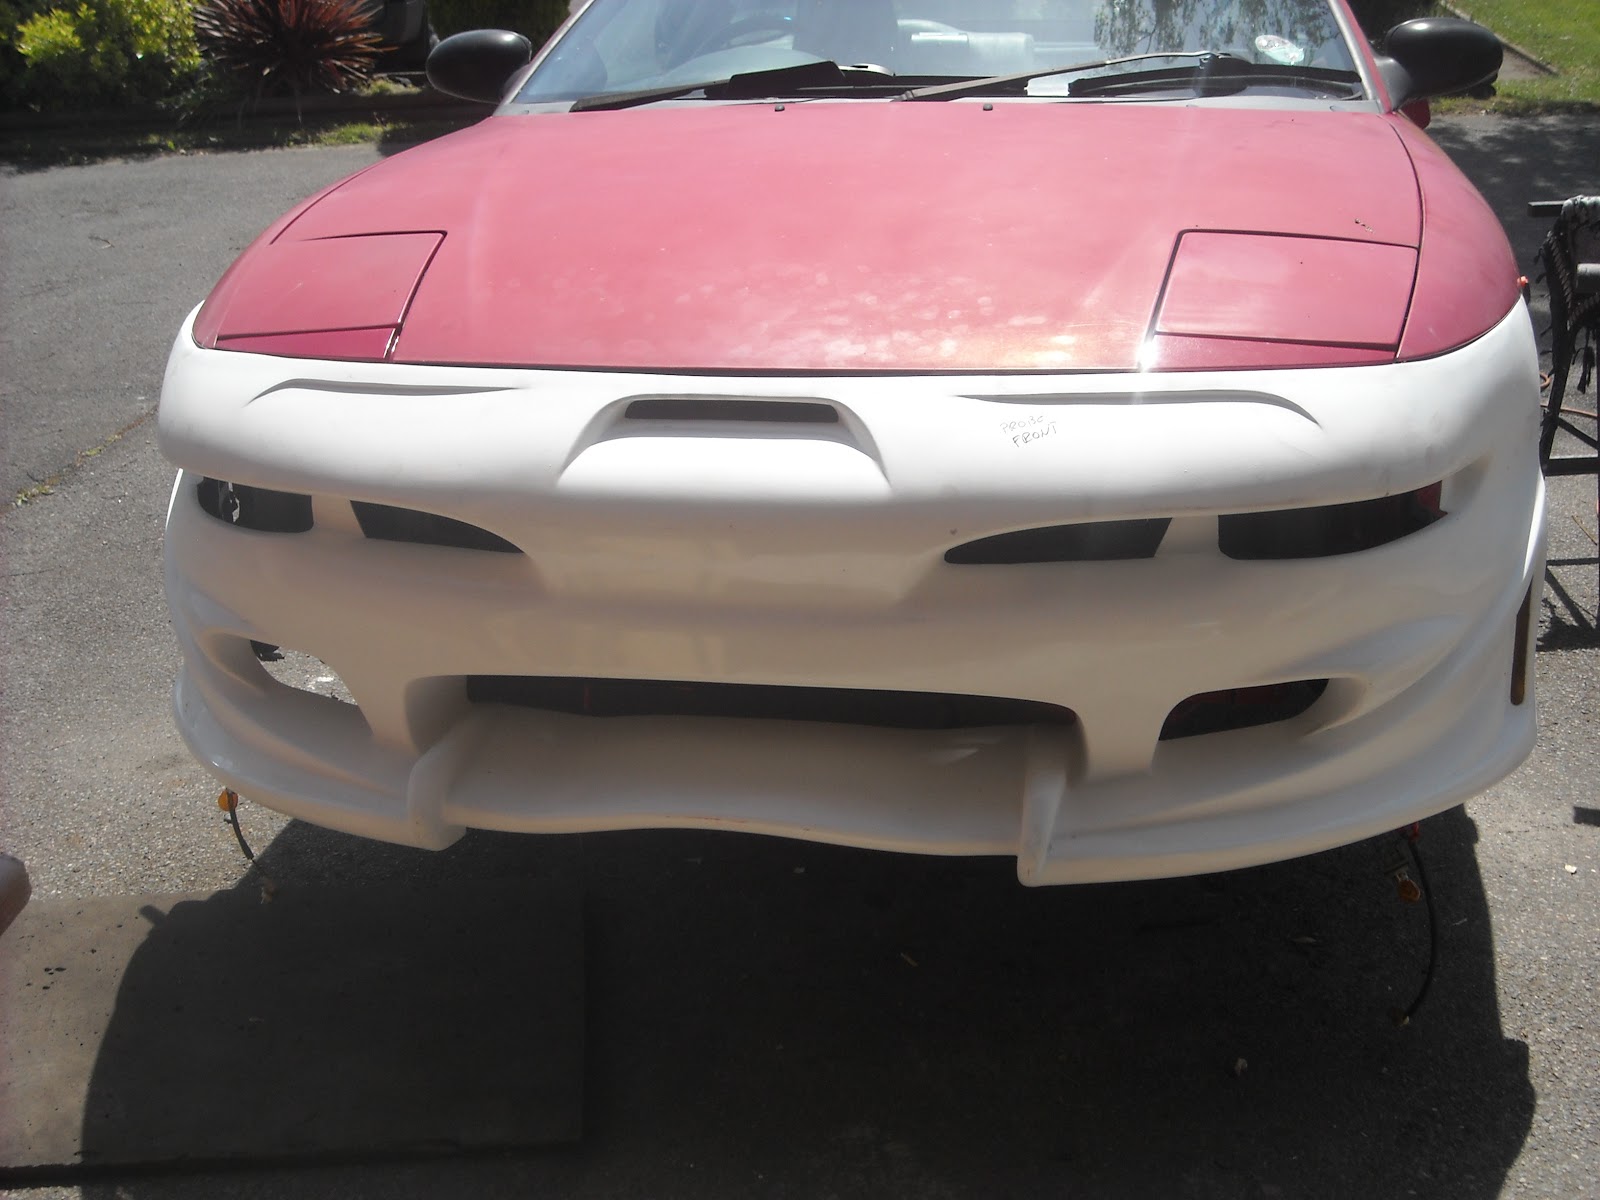
With a bit of persuasion and a round file I got the front bumper on and lined up with the hood and lights.  I then painted the hood and left side (I had already painted all of the right side). Then I fitted the front side light and indicator units.
----
I fitted the wheel arch liners and front wheels, then took it off the stands and finally tightened the wheel nuts. The fit and alignment looked good.
----
The photo below shows the side indicator repeater that I inherited from my friends old Cougar. I took the rubber from the old Probe repeater and with a small cut it fitted the new repeater. Nice touch!

251: Monday 27th May 2013

The front bumper line was a bit weird on one side and I could not get either of the gaps right on the infill panel between the bumper and just below the flip up lights, so I decided to fix the infill panel to the bumper permanently. I also made a small bracket to join the plastic substructure to the bumper and fibre glassed it and the substructure on.
----
I put an initial layer of fibreglass in the gap
----
When the first layer had set another layer went in to build it up to right level for a finish.
----
Next I sanded the fibre glass back to the level of the panel and the bumper. This revealed a row of pitted areas.
----
I put on a layer of filler. I use David's Isopon P38. Other brands are just as good, but I didn't realise that until recently, as it was all my local store had.
----
I sanded back the filler until it was just transparent and perfectly flat.
----
I put on a coat of white primer, then a coat of red. I also painted all the inside of the panel so that any part seen through a gap will be red. I ran out of day and put the bumper in the garage to dry. I wanted to have another day, but I guess it will just have to wait until the weekend unless I can do some more in the evening maybe. I am pleased with the way this has gone. I need to make a couple of brackets once the bumper is mounted to finish the fixing supports and then ready to finish the painting.

250: Sunday 26th May 2013

Started work on the front bumper yesterday. I spent some time helping with some gardening out the front as we are getting rid of our planter and having more space on the driveway for parking. I took the original bumper off and stripped the substructures and supporting bars off as well as the number plate and holder and the side lights / indicator units. Today I started with a loose fit of the front bumper. The photo below shows it hanging on the body with just a plastic clamp on each side. It was a good fit.
----
 I transferred the lights onto the new bumper. This was a simple matter of drilling the screw holes then fixing them. The substructures and support bars were all linked, so from one wheel arch, across the front to the other, everything was linked up. This made the aligning of the supports etc. really easy as then ends could only go in one place and everything else fitted well in between. Drilled all the holes and fitted it all together then mounted on the car. A few minor adjustments with a round file and it all fits well now. Tomorrow I shall be fibre glassing the sub structures to the skin or screws and nuts etc, then ready for painting.

249: Saturday 18th May 2013

With all the holes in the door and side filled I gave bottom half a blow over in red. I had sealed inside the door with polyurethane sealant and this was painted over too.
----
Wheels back on then off the axle stands.
----
Now just the front bumper and finish up the rest of the painting ready for a professional job. I still have no new batteries, so not ready to go back on the road yet. I had a short drive round to the car park to take some photos and back to my driveway and it was then dead. The duff battery I have is taking power out of the pack, so it is not really getting charged now.

----
More pics....

248: Sunday 5th May 2103

Started on a beautiful Saturday morning by removing the inner door panel. I had about 10 or 11 holes in the door where the clips for the old trim panel were. As this was not needed and would look silly now I had to fill these. With a fresh mix of fibre glass, I took my plastic scraper with some fibre glass on it inside the door and covered the holes from behind. While this was drying I went out to the summer house at the back of garden and got the other side skirt. I took off the old side skirt and trimmed a strip from it with the clips attached, fitted the strip back on then offered up the new panel. The panel would not go anywhere near the body with the clips strip attached. I took the clip strip off and offered the panel up again and checked the gap. It was a good fit, much better than the other side. By this time the fibre glass on the door was dry and I ground back the excess and spray painted with primer to stop any rusting. Then the rain came, and then the Hail came. So I went indoors and Twister was on TV, so I sat and watched, and that was Saturday.

----
Sunday was a beautiful morning, the sun was shining and I got reasonably early start (10 am). I filled the holes in the door that were fibre glassed ground back and primed the day before. I also filled the rear bumper panel as there was a dip where I had got carried away with the sander machine. I carried on with adjusting the clip strip on the other side skirt while the filler was drying. I cut more off the strip and made it so the clips were only secure on one side and could be bent in. I took one clip off altogether and cut the strip into 2 parts. The rear part was still too big, so I decided to just have one clip at the rear. I reworked one clip so it would fit under the trim, then drilled holes to mount the panel with screws. With the side panel nice and secure and fitted generally I marked the top of the trim where it meets the door ready to be trimmed later. This is necessary in order to make the door open without catching as the panel needs to drop down a few millimeters. The process was mostly the same as the other side except I kept some of the clips together on a strip of plastic to make is easier to mount them. The filler on the door dried and I rubbed it down to make it smooth. It took me 2 goes to apply the filler as it was so hot that it was going hard quite quickly. I sanded it back smooth, but the rear bumper needed another layer, so I mixed some more and put it on. More sanding and then  was ready to mask up the windows and other trim so they didn't get painted. I put primer over the bottom half of the door, generally covering my work and the rear bumper repair. A light sand by hand and I was ready to prep for painting. This involved a quick dust off with a dry micro-fibre cloth and a tissue wipe with white spirit to remove any trace of grease or other chemicals. I also sprayed a bit of the rear bumper where it had picked up some over spray of primer from another day. I sprayed the repair on the rear bumper and the rear quarter panel. I sprayed inside the edge of the door over the polyurethane sealant and then the outside of the door. I didn't have enough paint in the can to finish the door, but I got most of it done and it is not super important to be finished at this stage as  have plenty more painting to do and I can go over it again then. It is starting to look better and better.